Tech specs and my involvement
Frontend: AngularJS (v15) node.js (v16) as of Jan 8th, 2024
I started this project in 2017 with a team of 6 – 8 developers to build this Angular web app. The project has been constantly updated since then. Most of the frontend updates since 2019 are done by me.
Overview
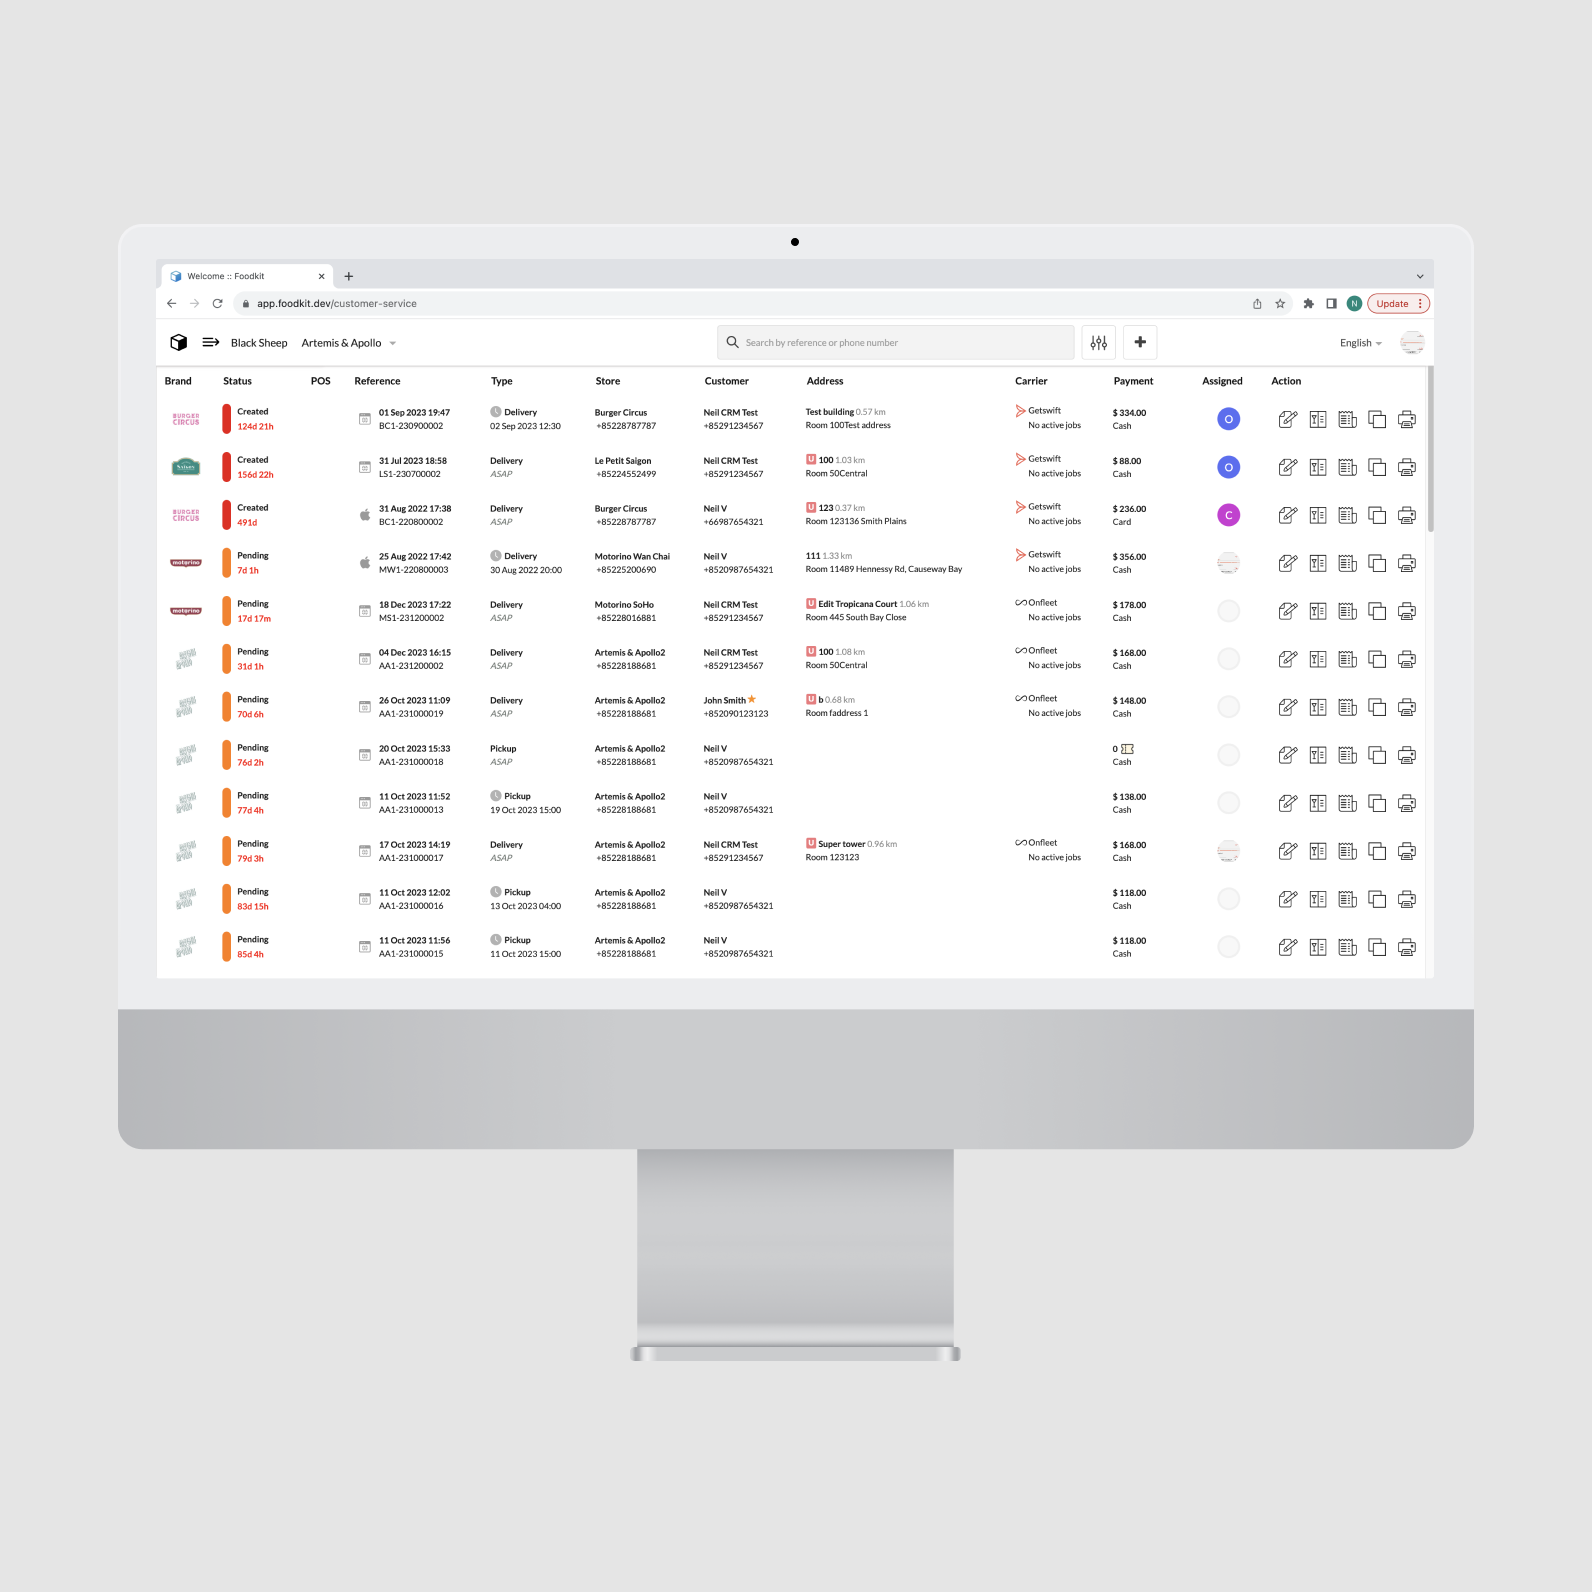
The Customer Service Dashboard (CSD) is an enterprise-grade order management dashboard that can be used by a call centre or operations team to monitor, manage and create orders in real-time.


This is a real-time view of all orders, sorted by status with the orders that most urgently need to be actioned first. This means “unverified” orders (those that need to be approved by customer service before progressing) appear first, followed by “pending” orders (those that need to be accepted by the restaurant), then “vendor accepted”, “driver accepted”, “dispatched” and then all other status ordered by creation time.
Order creation wizard
The order creation wizard is typically used in a call center setting to accept phone orders, but can also be used for testing purposes or to deal with customer service incidents where a new order needs to be created on behalf of a customer.
Here are the complete steps:
- Step 1 – Select customer
- Step 2 – Customer information & order type
- Step 3 – Address
- Step 4 – Products and coupon
- Step 5 – Payment and carrier
I added screenshots of some important steps below.

For Delivery orders, the user must provide the delivery address for the customer. If this is an existing customer record, a list of previously-used addresses will be shown from which the user may pick one. If this is a new customer account or the customer is ordering from a new location, a new address can be added
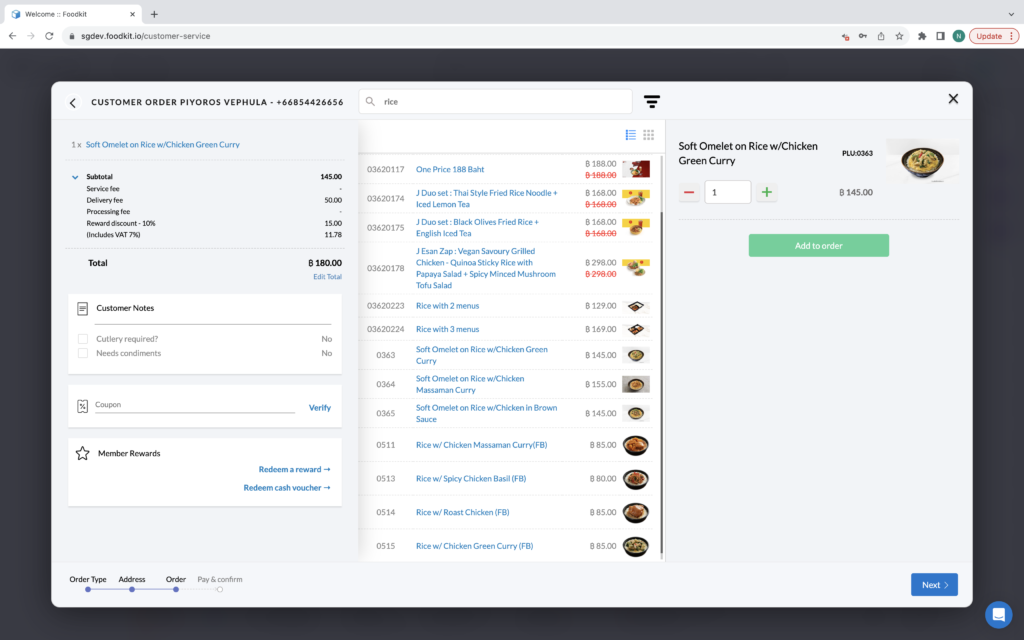
User can browse through to find the relevant product(s) for the order they are creating. They can also enter a full or partial product title or SKU in the search bar at the top of the screen to quickly find products. There is also a category filter which can be engaged by clicking on the filter icon (three horizontal lines stacked vertically).
When a user click on a product it will open the details in the right hand panel. It’s from this view that they can increase or decrease the quantity, and select modifiers/options (if relevant for the product). Once the quantity and any relevant modifiers/options have been provided, they can click on the Add to order button to add the item to the shopping cart.
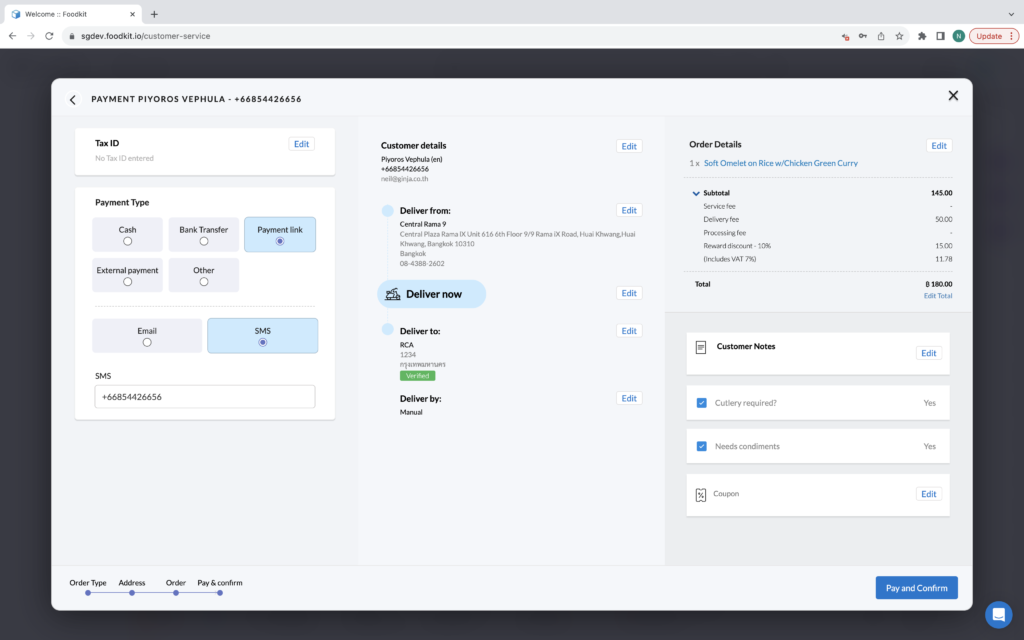
The last step of the order creation process involves configuring a payment method and assigning a logistics carrier (for delivery orders).
The payment method is entered via the panel on the far left of the window (Payment Type) whereas the carrier is assigned under the Deliver by option at the bottom of the centre panel. Note that the carrier will be assigned to the default carrier configured for their restaurant, so it only needs to be managed in the case that multiple logistics partners are enabled for their Foodkit installation.
An interesting option is the Payment link. When selected as the payment type, two pieces of information need to be provided:
- Payment link channel: the channel that will be used to send the one-time tokenized link to the customer. Will be either email or SMS.
- Payment link target: this will be either a email address or phone number that will be used to send the payment link (based on the selected channel). This will default to the email or phone number of the customer, but can be overwritten and sent to a different target.
Managing orders
After clicking on the status label for a particular order from the CSD list, the user will be taken to the status window for that order. This window shows a timeline, which highlights the current status of the order and shows timestamps for all previous statuses (which shows the time that the order moved from one status to the next).
From this page a user can click on a specific order state in the timeline to for the order to that state. They can also cancel the order from this page by clicking on the Cancel order button which will open the order cancellation dialog.
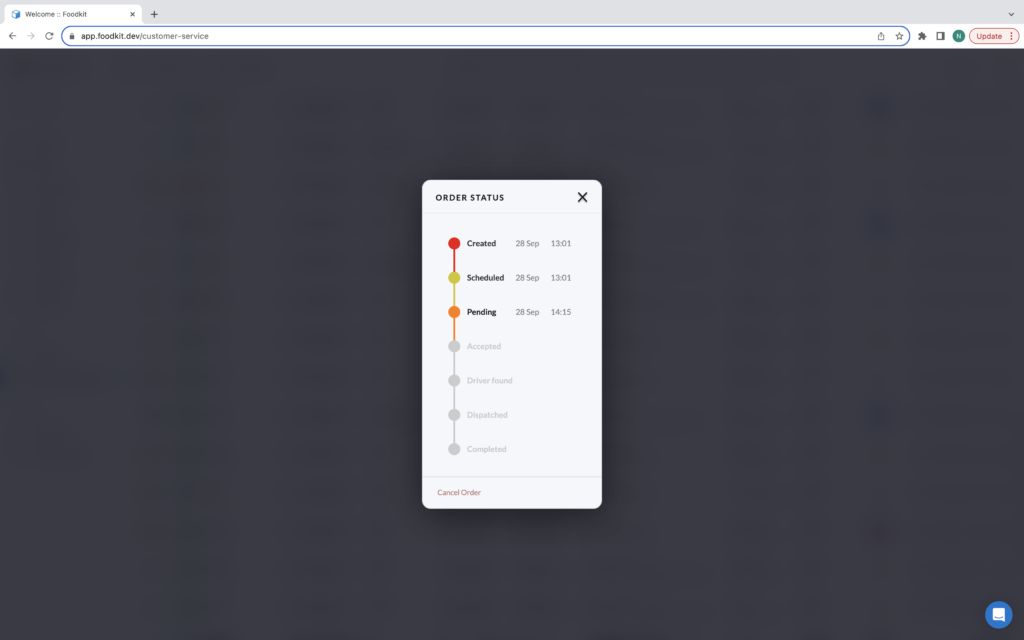
The order status label communicates the current status of the order. The possible values for order status are:
- Scheduled: the order has been received but is not due for fulfilment yet (pre-orders only).
- Unverified: the order has been received but needs to be approved by the customer service team before being sent to the restaurant (only valid when the Customer Service Dashboard is in-use).
- Pending: the order has been sent to the restaurant but not yet accepted by the staff.
- Vendor Accepted: the restaurant staff has accepted the order and is currently cooking/fulfilling it.
- Driver Accepted: the driver has accepted the job and is on the way to the restaurant (delivery orders only).
- Dispatched: the driver has taken the food from the restaurant and is on the way to deliver it to the customer (delivery orders only).
- Completed: the order has been fulfilled (delivered or picked up).
- Waiting for payment: the order has been created, but not yet paid for (credit card orders only).
- Payment link sent: the order has been created and a payment link has been sent, but no payment has been received yet (payment link orders only).
- Cancelled: the order was cancelled.
Carrier Status
The carrier column will show the status of the delivery booking. Before the order is confirmed, it will be blank. When the order is accepted by the restaurant, it will show Finding rider when the booking is created in the third-party logistics provider but has not yet been assigned to a driver. After a driver has accepted the booking, it will show the driver’s name and phone number (if available).
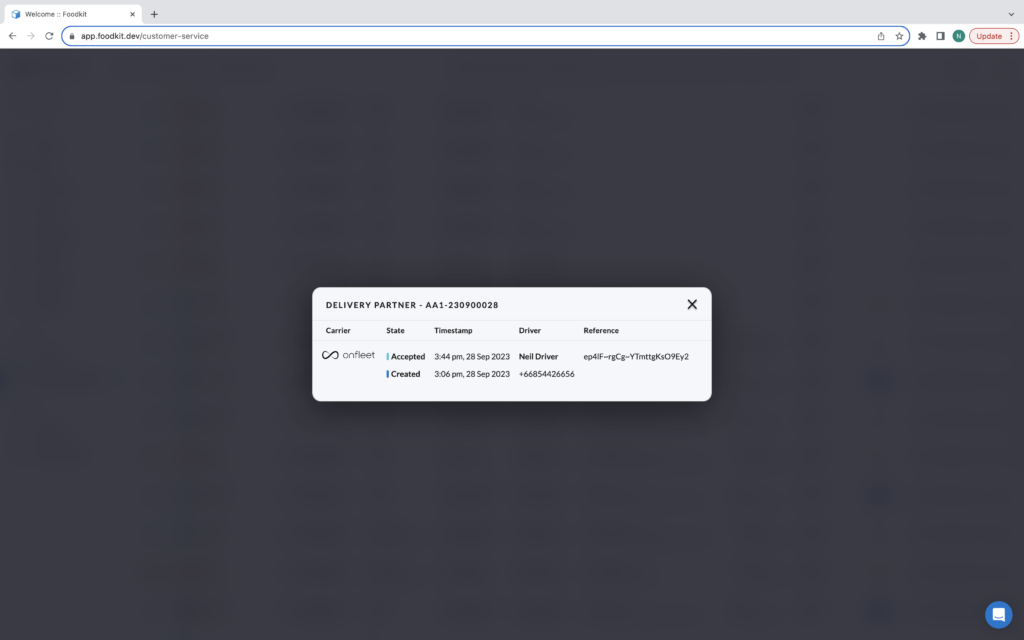
Clicking on the carrier column will open the Order Carriers window which contains a timeline of the different status transitions for the lifecycle of the booking.
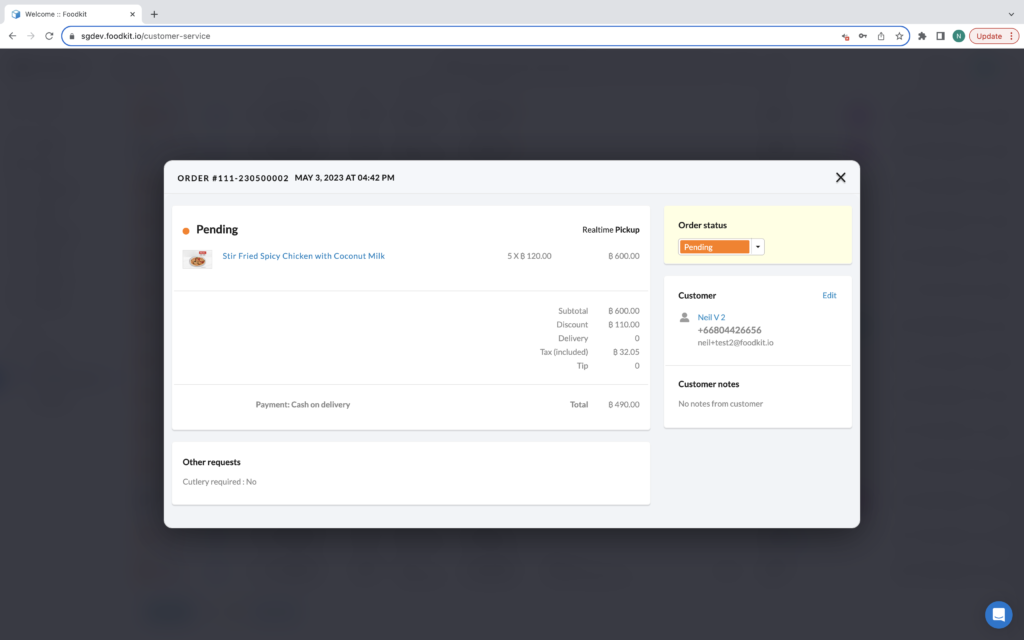
Order details
A single-page summary of the order. This shows all of the key order information in a single convenient view.